How to improve Machine Learning and Data Science performance using Intel Python
In this article, I will show you how you can get a huge speedup for Machine Learning/Data Science tasks using Intel Python.
What is Intel Python?
Intel Python is a version of Python that is optimized to run on Intel CPUs. This optimization yields significantly faster speeds when compared to normal Python, especially in Machine Learning/Data Science tasks.
Windows installation
- Download the files from here
- Extract the zip file downloaded
- Open command promt as administrator and change directory to the location of the extracted folder and type
cd intelpython3 - type
setup_intel_python.bat - COMMAND TO ACTIVATE
macOS installation
- Download the tarball from here
- Extract the tarball file downloaded with
tar -xvzf<NAME_OF_TARBALL> - type
cd intelpython3 - type
bash setup_intel_python.sh - COMMAND TO ACTIVATE
Linux installation
- Download the tarball from here
- Extract the tarball file downloaded with
tar -xvzf<NAME_OF_TARBALL> - type
cd intelpython3 - type
bash setup_intel_python.sh - COMMAND TO ACTIVATE
Installing Intel Python optimized packages
Once we have Intel Python installed, its time to install some Intel Python Optimized Packages. Intel has a Anaconda Cloud channel that has a number of prebuilt Intel Python optimized packages. Lets install some:
- First, we need update Conda:
conda update conda - Next, we need to add the Intel channel to our Conda sources:
conda config --add channels intel - Then, we need to install some libraries that allow us to take advantge of our Intel CPU:
conda install mkl mkl-devel mkl-static mkl-include - Finally lets install a package, in this case modin, which will allow us to take advantage of our Intel CPU in Pandas:
conda install -c intel modin - Make sure that it was installed sucessfully:
 python
 import modin.pandas as pd
If you dont get any error, that means that modin was installed sucessfully. Above, we just installed one of the many Intel Python optimized packages. You can view the full list in the above list. Note: For some reason, not all of the packages show up in the above list. To find a package that may not be listed in the above list, you can search on Google for the name of the package, followed by Intel Anaconda. For example, “sklean Intel Anaconda”. The result should be one of the first links. You can install that pacakge with the command provided on that specific page.
What about packages that do not have prebuilt versions in the Intel Anaconda Channel?
Some packages might support Intel Optimizations but do not have prebuild versions in the Intel Anaconda channel. One example of this is OpenCV. In this case, you will have to build from source, and while you are building form source, you have to set certin flags. In the case of OpenCV, you will have to set the following flags. You will need to have Intel MKL(installed above) and Intel TBB installed:
DWITH_MKL=ON
DMKL_USE_MULTITHREAD=ON
DMKL_WITH_TBB=ON
DWITH_TBB=ON
For other packages, you can consult the package’s documentation.
Performance
All of these tests were conducted on a Late 2011 13 Inch MacBook Pro with:
- Intel i7-2640M, which is a 2.8GHz dual core processor
- 16GB RAM
- Samsung 860 EVO SSD
- macOS Mojave 10.14.6 During the tests, nothing else was running in the background. I ran the tests from the terminal no ensure that there was no IDE overhead. The benchmark scripts that I used can be found here.
Sklearn
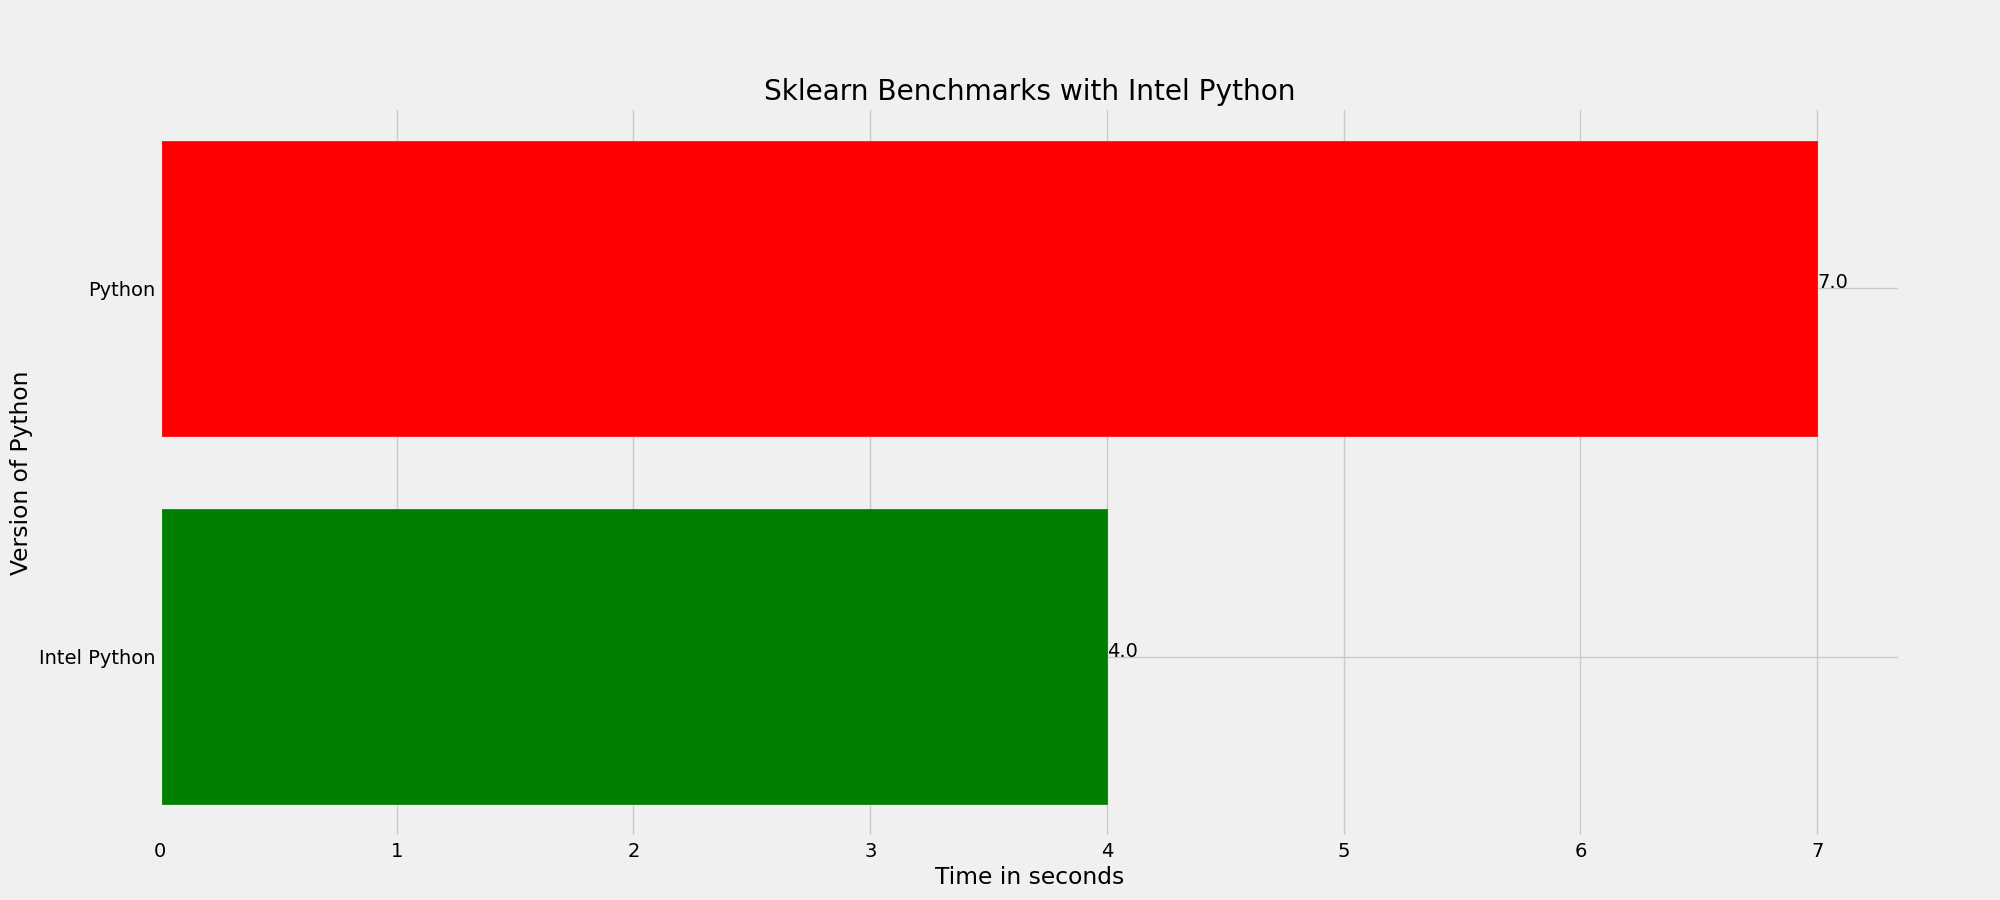
 As seen above, the time it takes to run the program is reduced by an impressive 43% when using Intel Python
PyTorch
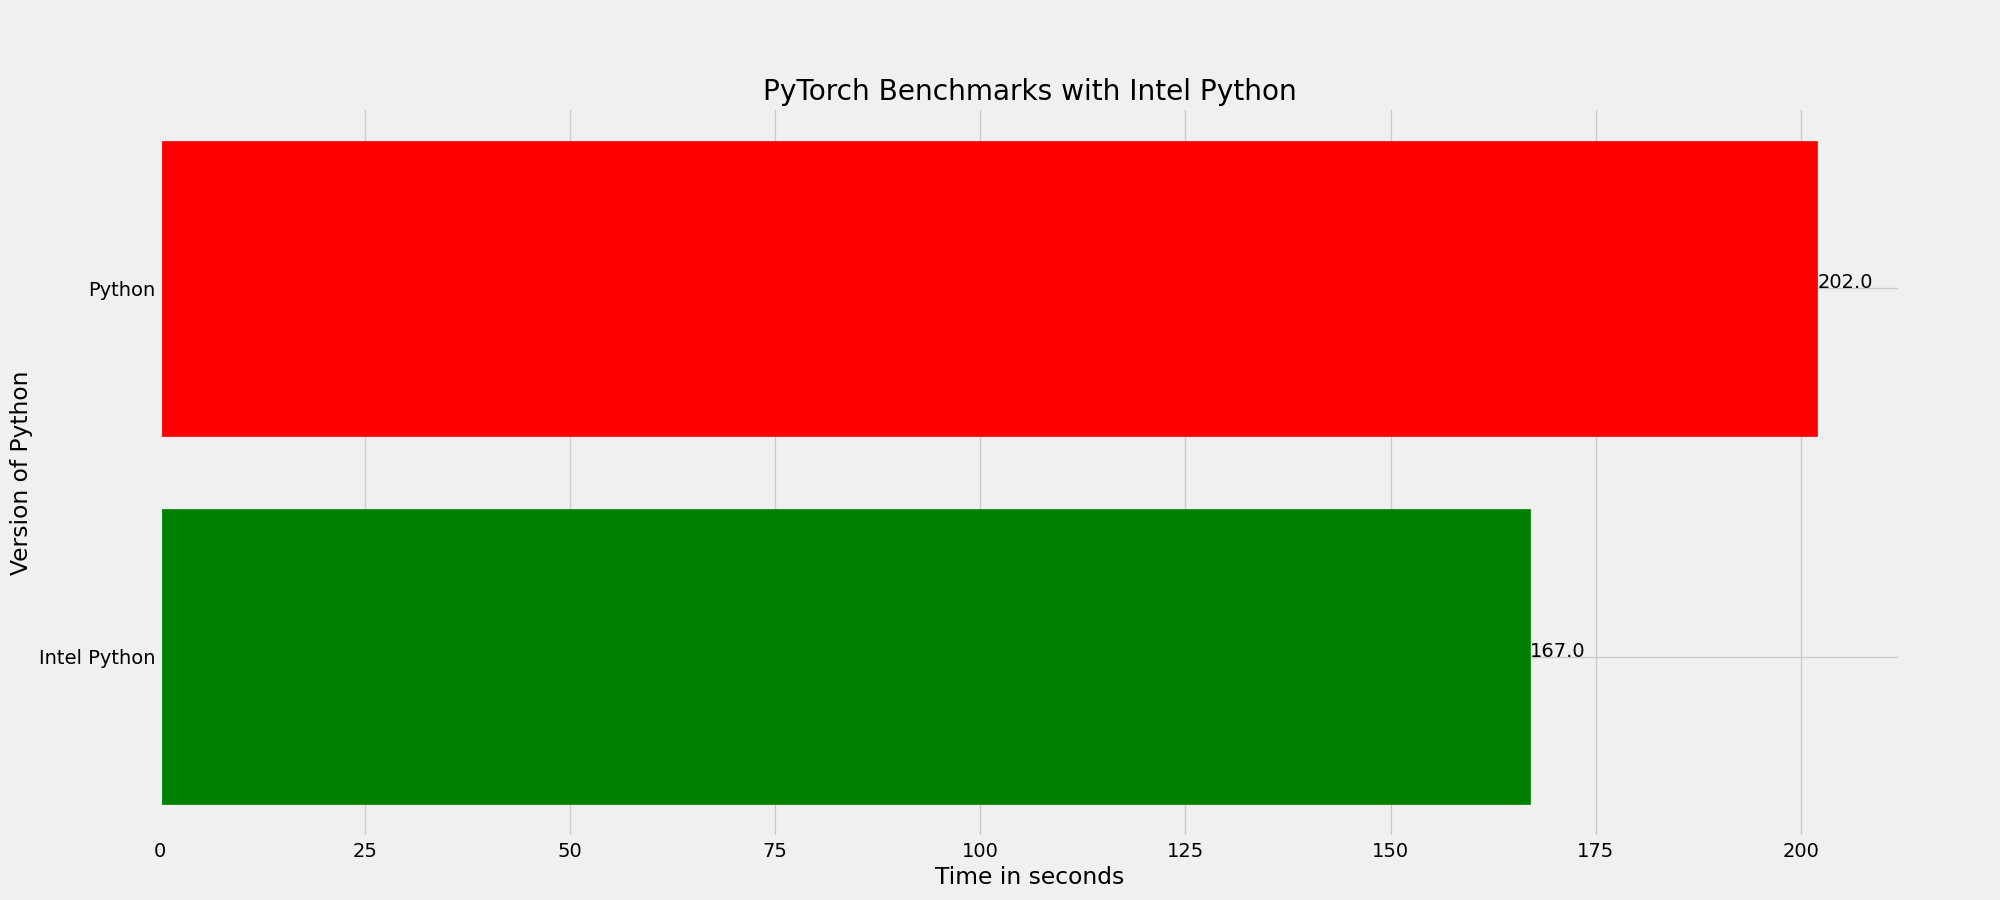
 The training time for the sample demo is reduced by a modest 17% when using Intel Python.
TensorFlow
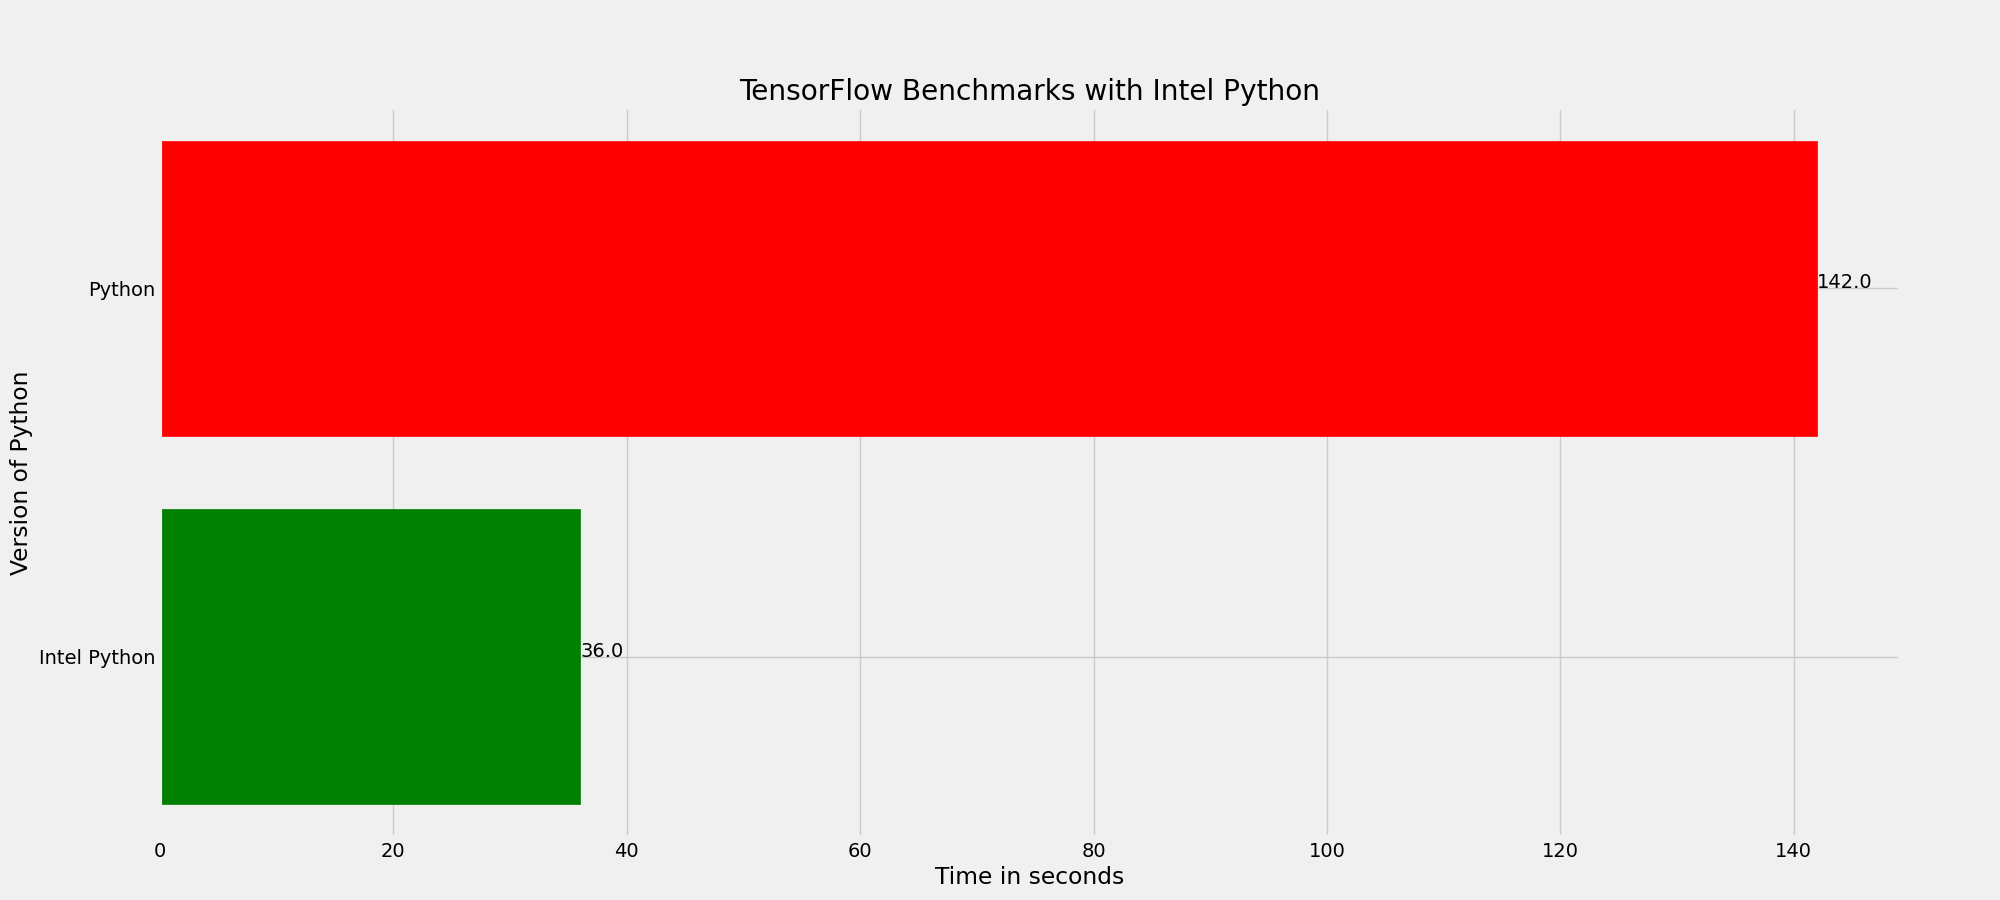
 TensorFlow sees the largest amount of improvement, with a whopping 75% reduction in training time when running the sample image classification demo.
Pandas
 Pandas sees a large amount, with a staggering 66% reduction in training time when loading a 3.22GB CSV.
Overall, there was a 83% improvemnt to speed when using Intel Python. However, some libraries see larger improvements then others.